Friday, March 30, 2018

Fusion Drive Spaceship Pt 2...... Parts and More Parts

It's been a busy week here at the shop 3D printing rather large parts for my fusion drive spaceship project. This has also been a good test of my new Creality CR-10 S4 3D printer.  I am learning new things making this project and getting to know the ins and outs of the new printer so it's all good. 


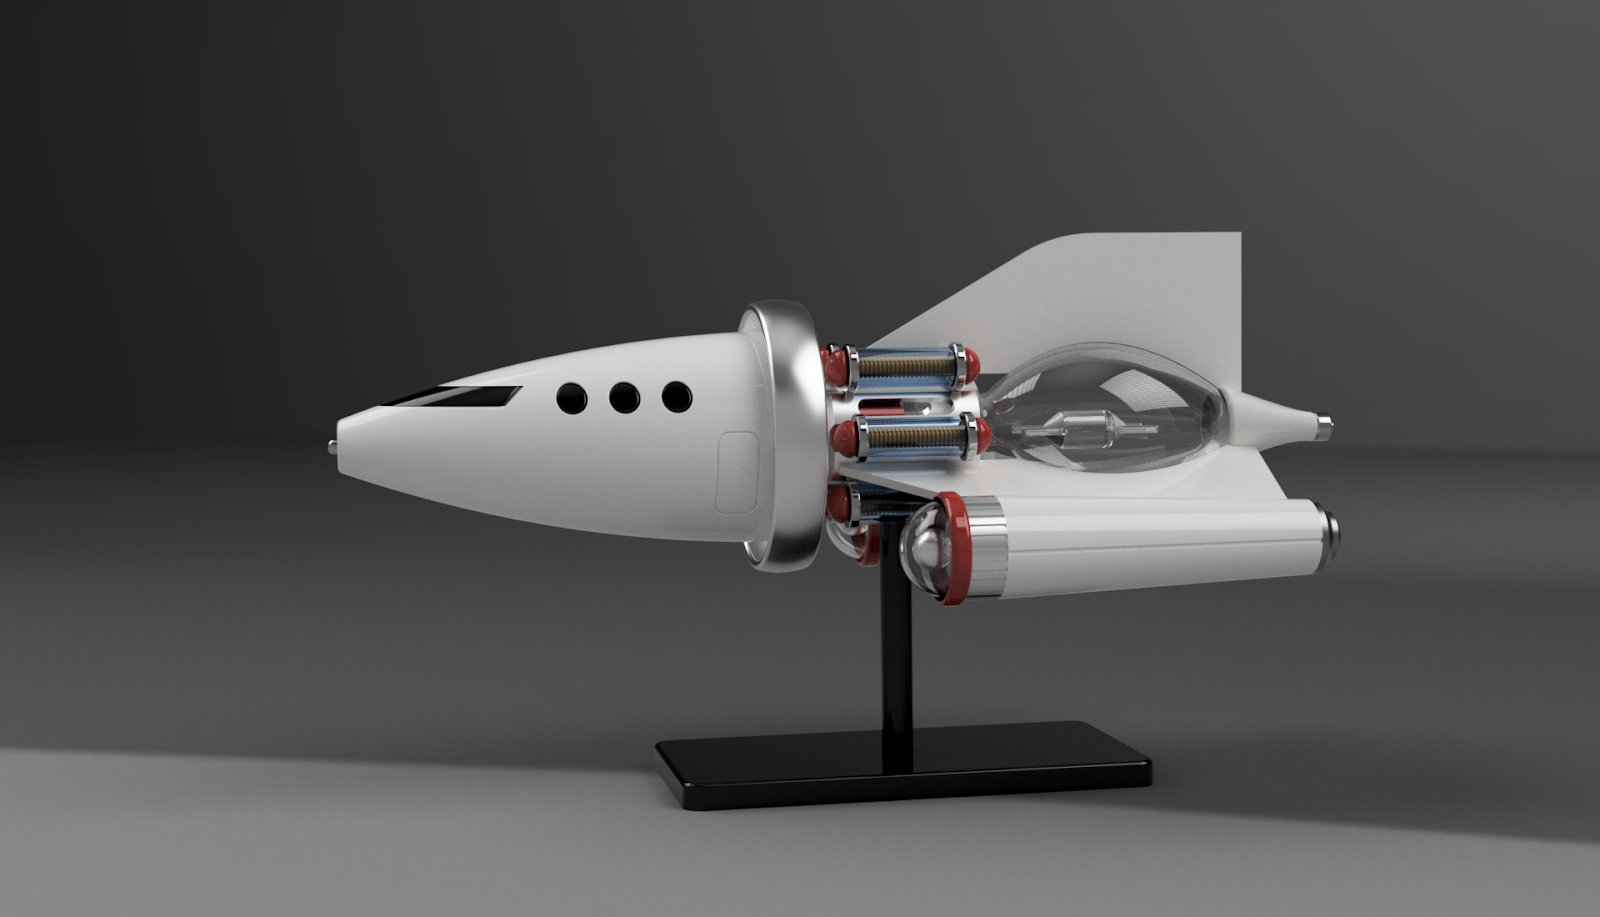
This is the final design of the model spaceship.  I still have not figured out a good name for the ship so if any of you have any suggestions I would be more than happy to hear from you.  The model when completed will be over 2 feet long so it is a BIG model to say the least.  With that in mind here are some of the components that I have already 3D printed.


These front assemblies took a little time to work out but the effect will look very good on the finished model.  In the image above you can see a clear dome on the right.  This dome is just half of a Christmas ornament that I had found at a craft store while shopping for parts some time back. Next is the mounting ring that the dome fits into and then the ring is mounted to the front of the engine assembly as shown in it's completed form on the left.  I will have to do some sanding and painting of course to match the computer model but I see no real difficulty in getting these assemblies the way I want them to be. 


Next came the ring that wraps around the mid-section of the spaceship.  This part printed very well and as you can see in the photo of me holding it, it's a pretty big part.  I will have to do a little prep work on the part to smooth it out but overall it is already in very good shape. It should look really good once I have it smoothed and painted silver for the project.


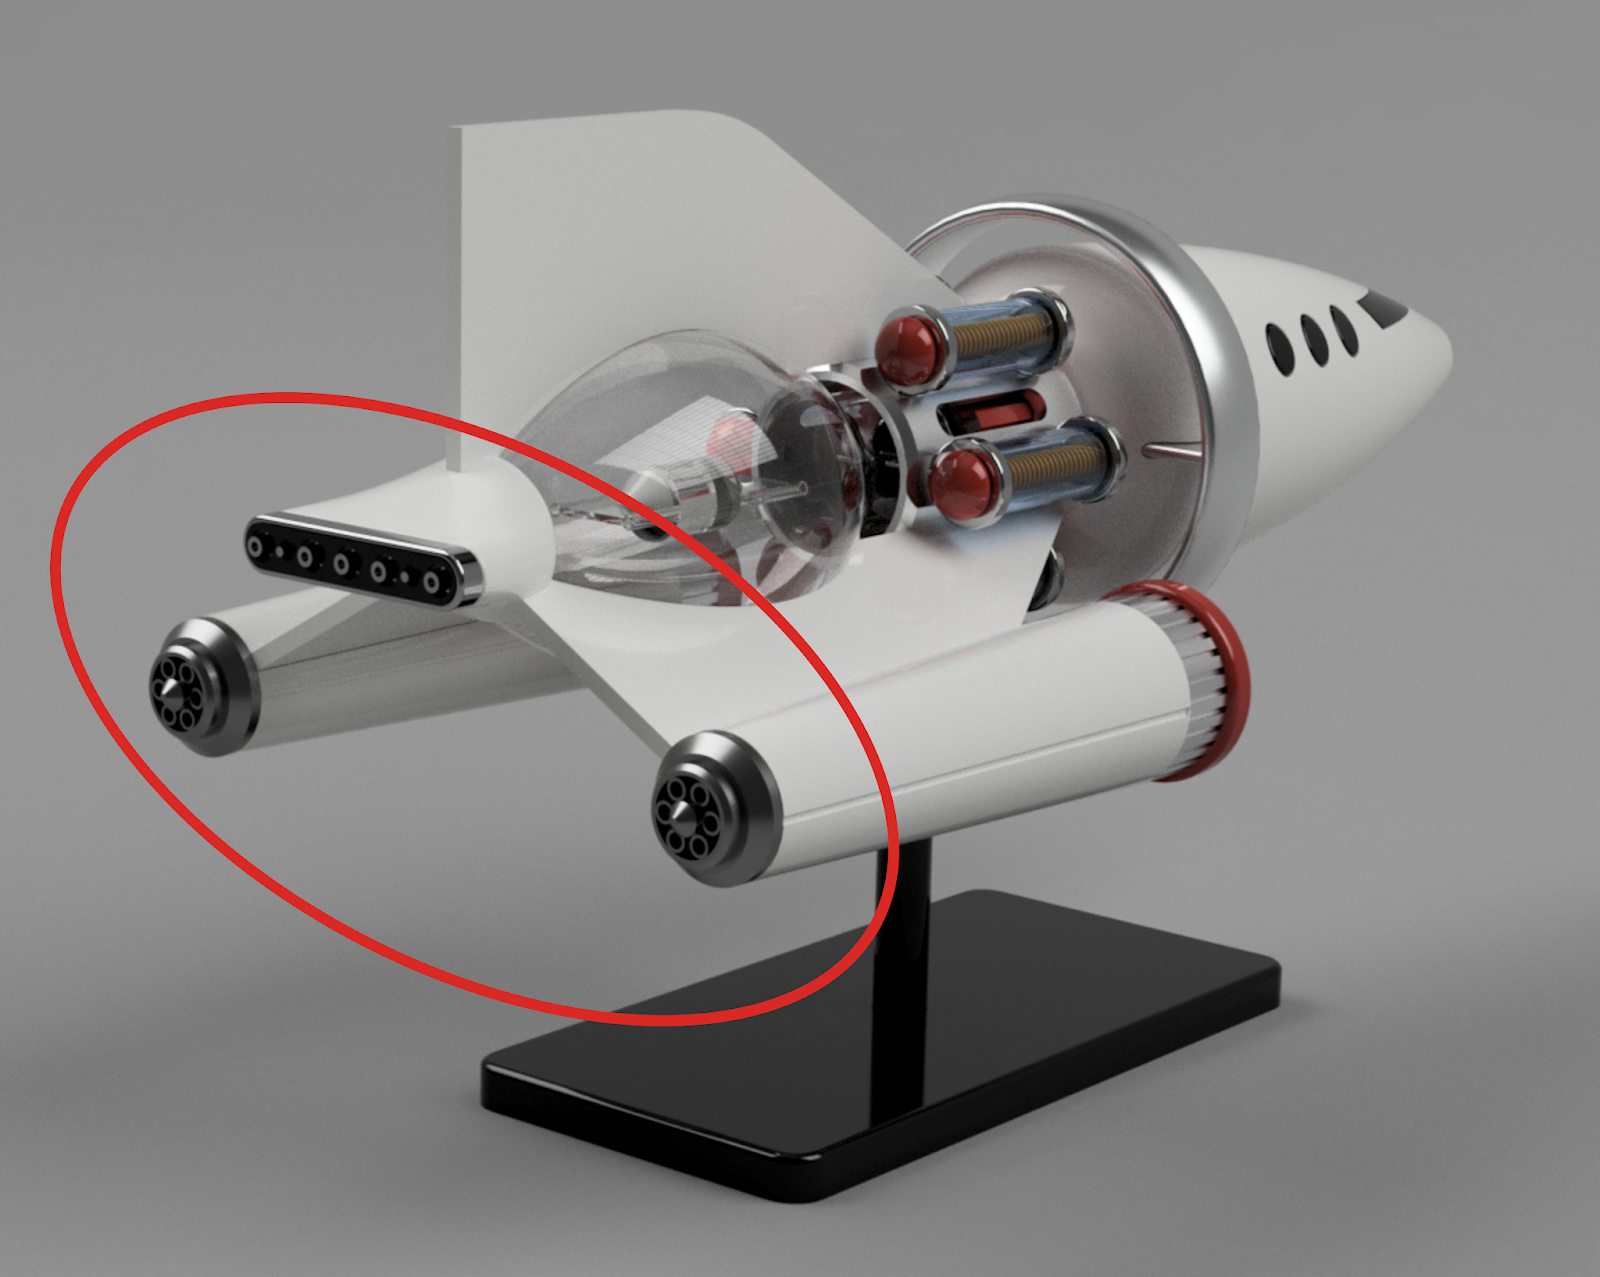
In this series of parts I 3D printed the components that make up the exhaust assemblies of the spaceship.  Again smoothing of the 3D printed parts will be needed to get them in shape but from the looks of it this will not be an issue to get them ready for painting once again.


Here are the components that make up the mount for the fusion drive (light bulb).  The top photo shows where the mount is located without the fuel canisters added so that you can see exactly where this assembly goes.  In the photo just below it on the left is the actual metal mount for the light bulb which will be the fusion drive for the spaceship. In the center is the housing for the metal mount and on the left is the outer mount for the fusion canisters that will be added later on in the build. 


Here the metal mount is assembled into it's housing 


Once the bulb mount is assembled then it is inserted into the outer housing for the fuel canisters.


Here is another shot of the model with the fuel canisters mounted to the mid-section of the model.  I still have some work to do on the canisters to get them ready for photos so I will hold off until the next installment of this project to show you how all six of the canisters are put together.  

So far with the 3D printing of the parts that I have just shown you it has taken me 58 hours to do the 3D printing.  The largest and last piece I plan on 3D printing is the front capsule where all the windows are mounted in the model.  From what my 3D printing software tells me this part alone will take 18 hours to 3D print.  Not sure I want to spend my entire waking day watching this part print or let it run through the night and hope for the best.  I will just have to see once I get to that point.  As I am writing this I am 3D printing one of the large white mid-sections for one of the side engines. Again this should take around seven hours or so to complete.  Not to bad as I got an early start on it this morning so before the afternoon is done the part will be also. So it will be a good day. 

Stay tuned for further updates on this project as it should be a pretty impressive build once I get all the parts 3D printed, painted and assembled into this big model.  


Friday, March 23, 2018

Becca's Enclosures Part 3

It's been a couple of months since I last posted photos of the fiber glass enclosure that my friend Becca Kacanda had been working on. Since that time she has been experimenting with smaller versions of the original enclosure to work out how she will decorate the new design.  I caught up with her yesterday and was able to get a few photos of her progress with this project.


Here is the completed three foot tall enclosure that Becca and I assembled.  Much lighter than the cast iron bath tub that she originally decorated.  With this portion of the project completed Becca thought it best that she work on some smaller enclosures just to get a feel of how she might decorate this very large structure.


This photo of Becca and the mid-sized enclosure that is almost fully decorated gives you a much better idea of how the large structure may end up.  All the pieces of glass and tile are hand glued on to the structure and then grout is applied to fill all of the voids between each of the small pieces.  Almost all of the small pieces had to be hand cut and fitted into this very intricate and decorative piece.  Impressive to say the least. 


Here is the smaller version of one of the enclosures again decorated in cut tiles, glass and stones. With the white grout this piece is my favorite.  With the addition of a small tea candle or a figurine inside the enclosures it will surely brighten up a space in one way or another. 


Here's Becca use a special tool to cut some of the small pieces that will go into the mid-sized enclosure.  All of this work she creates in her little studio located at the Key City Creative Center  makerspace in Dubuque Iowa.  

Becca and I have gotten to know each other pretty well while working on her project together.  I am more for the design and structural aspect of the things I make and Becca as you can see has a better eye for the decorative end of a project.  She certainly has that portion of this project down to a fine art.  With my help she can also now lay fiberglass down just as good as I can so it is another skill that she will surely use in more projects in the future.  Don't stop Becca!  Your doing great! 

Friday, March 16, 2018

Space Patrol Pistol Stand......An Update

After having spent the last couple of days 3D printing the stand for my newly created Space Patrol pistol I thought I should show it off as it turned out better than I had hoped.  So here you go.


The Space Patrol pistol display stand worked out very well as you can see.  I 3D printed the base for the stand using ABS plastic and it took roughly 6.5 hours to print.  It is a fairly large piece being 8" x 4.75" and 1/2" thick.  The vertical cradle for the pistol was also 3D printed and took 9 hours 20 minutes to make.  This simple slid into a rectangular opening in the base and was a very good fit so no glue was needed to keep everything in place.  


I spray painted the two components for the stand in flat black paint as I did not want the stand to be the focus of attention when the pistol was being displayed yet I still wanted something more than a simple look to the assembly.


To keep the pistol's paint from being scuffed while it was resting on the stand I added small felt pads to the curved indentations that were matched up to the shape of the body of the pistol.  The pads had a sticky back to them so it was a quick addition to the assembly that will serve very well in keeping the pistol in nice condition over the coming years. 


With the pistol resting on it's stand it was easier for me to get these shots of them together. 


I had to get one more shot for this post so I thought I would put both space pistols that I now have completed side by side. They make an interesting pair to say the least.  I still have plans to do one more pistol some time in the future but until then I am more than happy to be done with painting for a while and sit back and enjoy my efforts. 

Tuesday, March 13, 2018

Space Patrol Pistol Part 4...... It's Done!

I am very happy to report that I put the finishing touches on my Space Patrol pistol yesterday.  Now I just have to work on a simple little stand for it so that I can show it off properly.  With that being said I also did not want to wait another week to get the stand done just to show it off to my faithful readers like you here on the blog.  So here you go!


This project was challenging like most of my projects usually are and I always learn a few new things along the way.  The little embossed spaceship image on the side of the pistol is a perfect example.  I had never created this type of detail before on any of my projects but the effort was worth the end result. I had to use a micro-brush (aka...a very very tiny paint brush) to get the gloss black paint put on correctly. It took a slow steady hand to get it painted correctly so that was something new for sure. 


The painting of the yellow body for the pistol took some time as well.  Mainly prepping it so that it was smooth enough to paint and then laying down at least a half dozen very light coats of paint so that I did not have any runs in it when I was finished.  I really like the fact that the body of the pistol was 3D printed in two pieces and then bonded together.  Then it was a matter of making it look like it was just one piece instead of two with a seam.  Lots of sanding and prep work paid off with this very smooth looking shape.

Also nice is the little features that are on the pistol like the power control display and knob and the chrome and red heat vent.  This along with the red inserts on the pistol grip tie everything together. 


 The front section of the pistol with the red cup shape and the colored plexiglass disks also worked out very well and painting the silver parts were some of the easier pieces to create in this project. 


 I had to take one more shot of the pistol with me holding it to give you a much better idea of how large this 50's style space gun really is.  Something that would fit into any old SciFi movie to be sure. It will look good on my book shelf once I get the stand worked out for it.  Hope you've enjoyed the posts about the progress I've made on this project over the past few weeks.  I know I have had another successful build that I will be proud to show off once again.


Sunday, March 11, 2018

Space Patrol Pistol Project Part 3

A lot has been happening here at the workshop over the past couple of weeks so I thought it best I get everyone caught up on the Space Patrol Pistol project while I had the chance.  In the last post all of the components were getting ready to be prepped for painting.  I am happy to report that 99.9% of the painting has been completed.  So with that being said here is how that part of this project has turned out. 


Here is a collection of some of the smaller parts that needed to be painted for this project.  Starting at the upper right corner is the body collar, the nozzle ball tip, the power control dial, a chrome painted vent shield, and finally the base nozzle again in chrome paint.  Just below these part are three more sections of the nozzle (in chrome paint), the trigger (In red), and the vent ring again in red paint.  The larger "L" shaped pieces in the lower left are the pistol grip inserts and last but not least is the nozzle cup in nice bright red paint.  


Here's a very good looking shot of the pistol grip for the project.  As with all of the 3D printed parts I took my time and worked on making each part as smooth and clean as possible.  The pistol grip was no exception.  I wanted recessed areas on the grip for the red inserts and so the grip needed to be 3D printed in two parts and then bonded together.  Once I had accomplished this task it was just a matter of smoothing the part out and then priming and painting it glossy black.  I'm happy how the part turned out.  The photo above was taken after the paint had dried so it is just the look I was going for. 


With all of the parts painted I was able to take the photos shown above.  From the black ball tip of the pistol to the yellow body cap shown above you can see all of the components of the front half of the pistol.  In the black ball at the front of the tip of the gun is a 1/4-20 nut that in encased inside of the sphere.  This was accomplished by 3D printing the ball in two section and then installing the nut before epoxying the two halves together.  I really like how smooth and glossy this part turned out. Then I installed an 8.5 inch long 1/4-20 threaded rod that was inserted into the ball and tightened on to the nut.  From there all of the other components making up the front section were slid into place and finally  secured with another nut that is inside the body cap as show in the top photo.


Next in the assembly as shown above is the addition of the pistol body.  This is accomplished by sliding the two mounting arms that extend out of the body cap into the body opening.  In the arms will be two 1/4-20 nuts and then finally two chrome fasteners will hold the front section of the pistol in place through matching mounting holes on both sides of the body. 


Here are a couple of good shots of how the assembly looks with the front assembly slid into place and mated up to the body of the pistol. 


Once the front assembly is secured in place the pistol grip and it's red inserts will be joined together. The grip and the other miscellaneous components till be mounted on to the body of the pistol at this point.  I still need to do a little detail painting on the extruded spaceship that is on the body yet.  Once this is completed final assembly will be the last task before I can sign off on this project and call it good.  So far things have progressed very will with all of the paining of the parts so I can breath a little easier at this point.  

I have a stand for the pistol designed and will have to 3D print the parts for it in the next couple of days so I can have a simple way of showing off the new Space Patrol pistol properly when I have it finally completed. It will be a nice addition to the first space pistol that I did some weeks back.  I'll be sure to post additional photos about this project in the final installment of this project very soon.  Until then I hope your latest project is working out as well as this one has so far for me. 

Thursday, March 1, 2018

A New Project....From Dead Light Bulb To Fusion Drive Spaceship

About a week ago or so I was helping a friend of mine work on his enclosure design for his 3D printer.  He had brought me something out of the ordinary. What he had brought along to my house was a dead light bulb.  But not just any ordinary bulb.  


This was  a large 400 watt industrial bulb that had burned out at his place of work.  I have never seen anything as large as this bulb and he thought I might like it to use in one of my projects. I really liked the shape so I thought it might have possibilities. On the base of the bulb was a rather old looking porcelain socket which I was able to remove and retrieve the inner metal socket that was still in good shape. As you can see from the photo above the glass is still nice and clear with no cracks but the element on the inside is dark from having been burned out.  It measures 11.5 inches long. 


(Click on the images for a larger view) 

After some thought about this beautiful bulb I struck on the idea of making a spaceship model from it.  The photo above is the first version that I had come up with using Fusion 360 CAD software. I liked the overall shape of the new spaceship but at this point it was just a rough idea.  In the photos above the project at this point could be either a spaceship or a submarine.  Also the idea of the clear canopy would be possible but I was not sure if I could make it without some help. 


The next version of the project was looking like a proper spaceship at this point. I blacked out the clear canopy which would be an easy fix to making it as it could simply be painted on to the capsule to complete the look.  With the addition of the rocket engines, fuel tanks, fins, landing gear and a tail thruster the project was looking more promising. 


Then I did one more redesign to change the look completely of the capsule and the scale of the spaceship. I discarded the large canopy and changed it to be a single wrap around  windshield and three port hole windows on each side of the front section of  the spaceship.  This changed the scale of the ship so that it appeared to be much larger than the first spaceship with one large canopy. 


Pictured above are a good collection of all the different views of the spaceship.  I will have to work out the details for the assembly of this rather large model that I will be able to 3D print on my new 3D printer that I just got up and running over the past couple of weeks.  From the computer design I will be able to break all of the components down so that they can be assembled like any ordinary plastic model.  Once completed the spaceship will be 25.25" long, 9.8" tall and 11.25" wide.  It should be an impressive model once I get it all together.  

I still have a couple more projects that I have to finish first before I will start construction on this project.  I also have to wait for a couple more components that I want to install into the model. I will have to wait until these show up so I can incorporate them into the model.  One idea that I am looking at is to light the fusion drive (the dead light bulb) at the rear of the model using electroluminescent wire that could be wrapped around the glass base of the bulb and then powered by a small battery pack that would be mounted into the capsule of the model.  I will have to test out this idea before I actually build it into the model to see if the EL wire will give the fusion drive a nice glow when lit.  Even without lighting the model it will still be quite impressive when I get it built.  It should be another challenging and fun project to work on in the coming weeks. I'll let you know when the build starts!